AWS CLI & Utility Functions
Overview
The Portico AWS Utility Functions is a comprehensive bash script that simplifies common AWS operations for Portico development team. It provides an intuitive command-line interface for AWS profile management, EC2 operations, S3 file operations, and SSM session management.
Core Functions
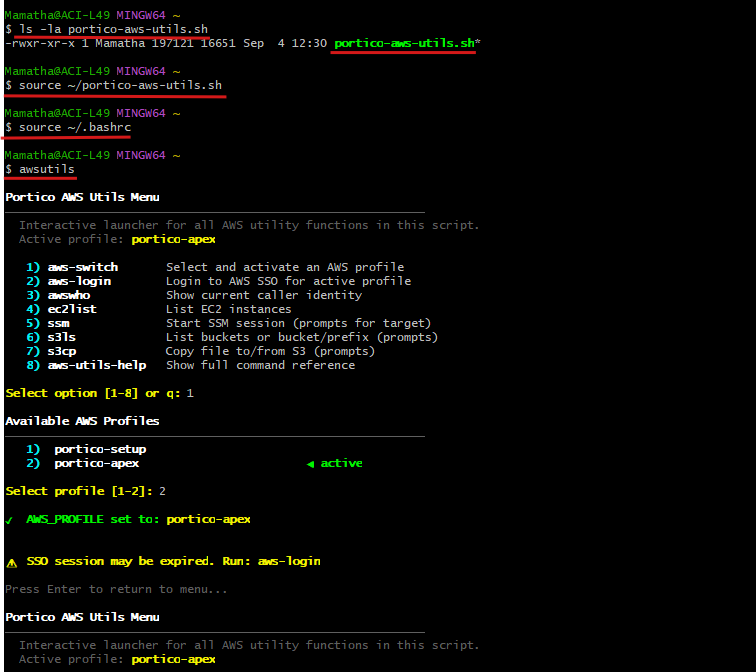
awsutils - Interactive menu launcher
aws-switch - Select and activate AWS profile
aws-login - Login to AWS SSO
awswho - Show current identity
ec2list - List EC2 instances
ssm - Connect to EC2 via SSM
s3ls - List S3 buckets/objects
s3cp - Copy files to/from S3
aws-utils-help - Comprehensive help reference
AWS Vault Setup: Portico AWS CLI Utility | AWS Vault and Local Credential Access Programmatically:
Key Features
🔐 Easy AWS profile switching and SSO authentication
🖥️ EC2 instance management and SSH-less connectivity via SSM
📦 S3 bucket browsing and file operations
🎨 Color-coded output for better readability
📖 Interactive menu and comprehensive help system
⚡ Quick shortcuts for common AWS tasks
Installation & Setup
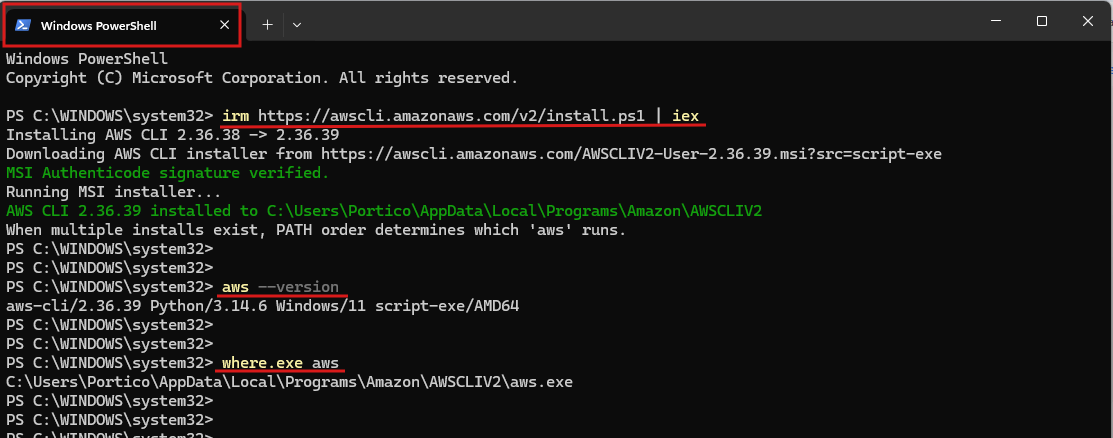
1. AWS CLI Installation
- Install AWS CLI v2 using PowerShell.
irm https://awscli.amazonaws.com/v2/install.ps1 | iex
- Verify installation:
aws --version
- Check installation path:
where.exe aws
2. Config Setup
Create the .aws directory and config file:
mkdir ~/.aws
cd ~/.aws
vi config
Paste the provided team-specific config (e.g., Apex team):
[profile portico-setup]
sso_start_url=https://ithaka-sso.awsapps.com/start
sso_region=us-east-1
sso_account_id=875219073553
sso_role_name=PorticoApexV1
region=us-east-1
cli_auto_prompt=off

[profile portico-apex]
sso_start_url=https://ithaka-sso.awsapps.com/start
sso_region=us-east-1
sso_account_id=720294270740
sso_role_name=PorticoApexV1
region=us-east-1
cli_auto_prompt=off
Paste the contents of the provided
.txtfile intoconfig.Save and exit (
:wqinvi).
3. What is a Profile?
A profile is like a workspace or environment.
It tells AWS CLI which account, region, and role to use.
Example:
portico-setup→ used when working in setup environment.portico-apex→ used when working in Apex environment.
You switch profiles depending on where you’re working.
4. What is SSO?
SSO (Single Sign-On) means you log in once and gain access to multiple AWS accounts without re‑entering credentials each time.
It uses your organization’s identity provider (like Okta or AWS SSO) to authenticate you securely.
In our config file:
sso_start_url→ the login page where authentication begins.Example:
https://ithaka-sso.awsapps.com/startis the starting point for login.
5. Explaining Config File Contents
Each line in the config has meaning:
profile name → portico-setup or portico-apex (environment identifier)
sso_start_url → where login starts
sso_region → region for authentication
sso_account_id → AWS account you’re logging into
sso_role_name → IAM role assigned to you
region → default AWS region for commands
cli_auto_prompt → whether CLI prompts interactively
6. Working with Multiple Profiles
If you’re working in setup environment, use
portico-setup.If you’re working in apex environment, use
portico-apex.
Switch profiles using:
aws-switch
Then log in with:
aws-login
Installation Steps
1. Download the Script
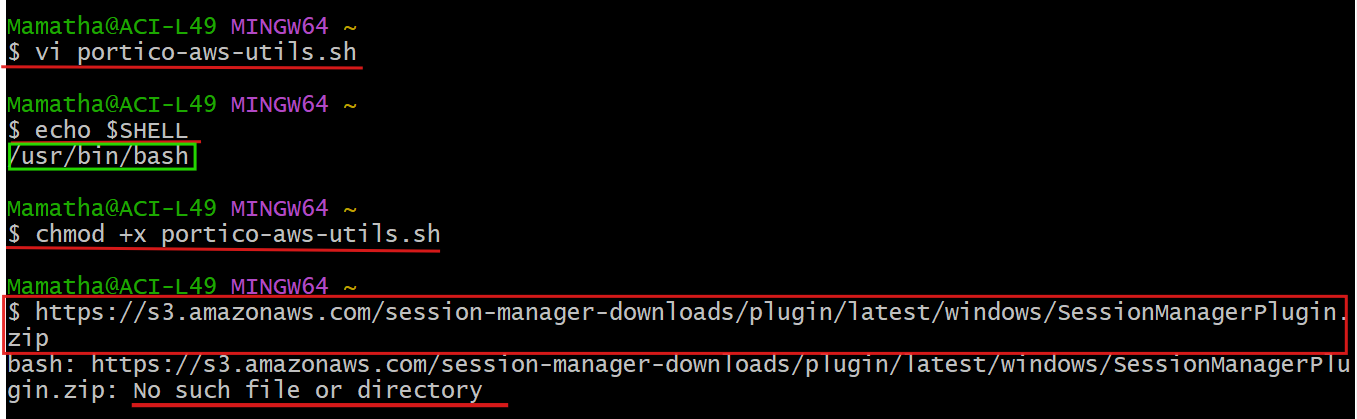
You created the utility script file using vi:
vi portico-aws-utils.sh
viopens a text editor in the terminal.Here you paste the script content and save it.
This file contains all the custom AWS utility functions.
2. Check Current Shell
echo $SHELL
This command shows which shell you’re currently using.
Output:
/usr/bin/bashconfirms you’re already in Bash.If not Bash, you would switch using:
chsh -s /bin/bash
3. Make Script Executable
chmod +x portico-aws-utils.sh
chmod +xgives execute permission to the script.Without this, you can’t run it as a program.
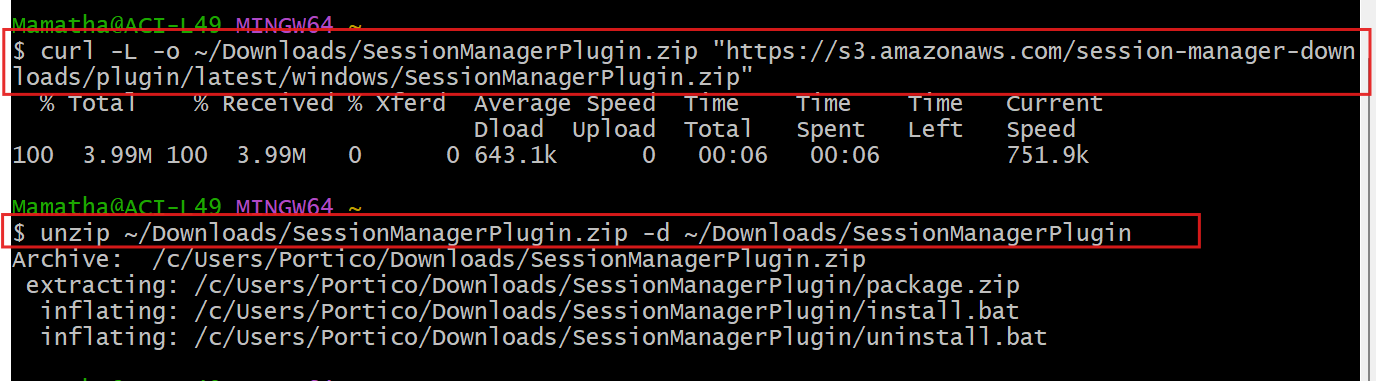
4. Download Session Manager Plugin with Curl
curl -L -o ~/Downloads/SessionManagerPlugin.zip "https://s3.amazonaws.com/session-manager-downloads/plugin/latest/windows/SessionManagerPlugin.zip"

unzip ~/Downloads/SessionManagerPlugin.zip -d ~/Downloads/SessionManagerPlugin
curl -L -o→ downloads the file and saves it asSessionManagerPlugin.zip.unzip→ extracts the contents into a folder.
Session Manager Plugin Installation Explained
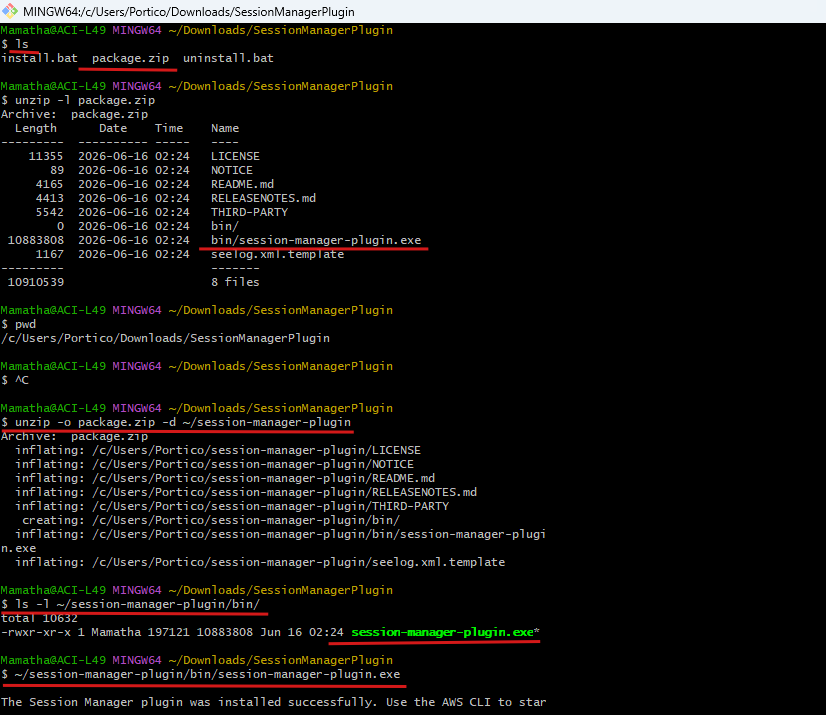
1. ls
ls
Lists the files in the current directory.
Useful to confirm that
package.zipis present before extracting.
2. unzip -l package.zip
unzip -l package.zip
Shows the contents of the zip file without extracting.
You saw files like
LICENSE,README.md, andbin/session-manager-plugin.exe.This confirms the plugin executable is inside.
3. unzip package.zip
unzip package.zip
Extracts all files from the archive into the current directory.
After this, the plugin files become available for use.
4. pwd
pwd
Prints the current working directory.
Helps you confirm where the files were extracted (e.g.,
~/Downloads/SessionManagerPlugin)
5. ls -l
ls -l
Lists files with detailed information (permissions, owner, size, modification date).
You saw
bin/session-manager-plugin.exewith executable permissions.This confirms the plugin is ready to run.
6. Running the Plugin
~/session-manager-plugin/bin/session-manager-plugin.exe
Executes the plugin directly.
Output:
“The Session Manager plugin was installed successfully. Use the AWS CLI to start a session.”This means installation worked correctly.
6. Add Plugin to PATH
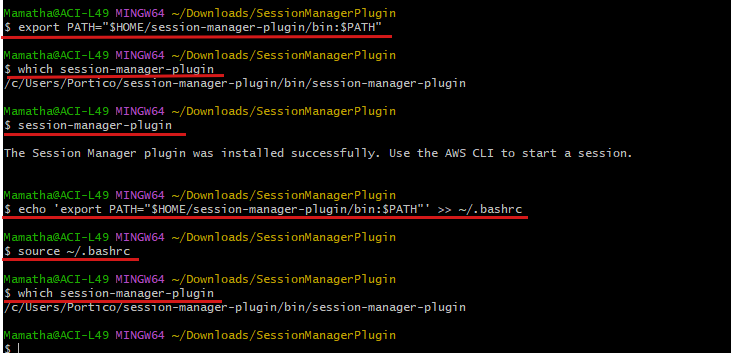
export PATH="$HOME/session-manager-plugin/bin:$PATH"
which session-manager-plugin
Adds plugin location to your PATH so it can be run globally.
whichconfirms the location.Running
session-manager-pluginshows:
“The Session Manager plugin was installed successfully. Use the AWS CLI to start a session.”
7. Make PATH Permanent
echo 'export PATH="$HOME/session-manager-plugin/bin:$PATH"' >> ~/.bashrc
source ~/.bashrc
which session-manager-plugin
Adds the PATH setting to
.bashrcso it persists after reboot.Reloads
.bashrcwithsource.Confirms plugin location again.
8. Source Utility Script
Finally, source the utility script and start the menu:
source ~/portico-aws-utils.sh
source ~/.bash_profile
awsutils
sourceloads the script into your shell.awsutilslaunches the interactive menu with all AWS utility functions.